
PVC Inkle
So I’m a bit spastic with arts and crafts. The idea of inkle and tablet weaving sounds fun now, but will I stick with it? Before I go investing any money in a real loom, decided to make a basic one out of PVC to use for now.
What you will need:
- 10 T connectors for ½ inch diameter PVC
- 4 90 degree elbow connectors for ½ inch diameter PVC
- 4 3 way connectors for ½ inch diameter PVC
- 4 1ft. lengths of ½ inch diameter PVC
- 7 5inch lengths of ½ inch diameter PVC
- 2 10inch lengths of ½ inch diameter PVC
- 12 1inch lengths of ½ inch diameter PVC
- 2 1ft lengths of 3/8 inch threaded rod
- 2 nuts for 3/8 inch threaded rod
- 4 3/8 inner diameter washers wider than ½ inch
- JB Weld
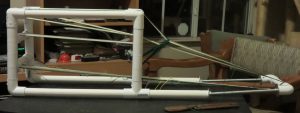
The pictures below are fairly self explanatory of how it fits together, but I’ll give a quick summary.
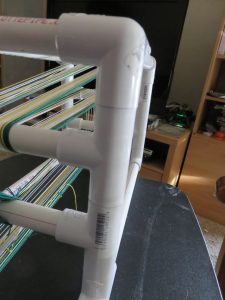
Rear uprights – These stacks are one elbow, a 1inch piece of PVC, one T longways, another piece of 1inch PVC, another T longways, another piece of 1inch PVC, and a 3 way connector. Connect these two uprights with 3 of the 5inch lengths of PVC
Front uprights – These stacks are one T middle opening up, a 1inch piece of PVC, one T longways, another 1inch piece of PVC, another T longways, another 1inch piece of PVC, and a 3 way connector. Connect these two uprights with 3 of the 5inch lengths of PVC.
Between the 3 way connectors, and the elbows and bottom Ts, place the 4 1ft lengths of PVC. This forms the square. Take the 2 10inch sections of PVC and connect them to the opening in the bottom Ts. Take the last 5inch piece of PVC and connect it to the last two elbows. JB Weld a washer onto each open end of the elbows, and onto the opening of the 10inch pipe sections.
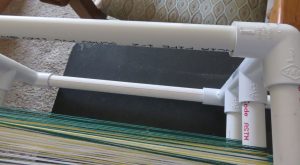
When this has cured, thread the nuts onto the threaded rod, 1 each, and insert the shorter ends into the 10 inch pipes through the respective washers. The last pipe with the elbows and washers will fit onto the other end of the threaded rod. Note this has no structure on its own, its the thread tension that will keep these parts together.
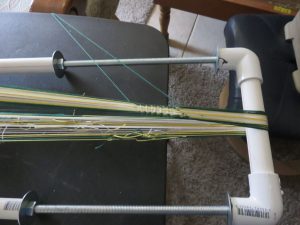
Take off one side of connectors, and warp up the loom! Be aware that since the tension arm is loose you should do this on a table and watch that the arm doesn’t tilt in towards the loom making for uneven tension.
Overall, it’s working out well. If we had to do it over again, we’d put a cross brace in front of the first upright between the two 10inch pieces to help with stability when tensioning and warping. As is though, all the supplies, including the JB Weld, was less than $20.


Just curious as to whether or not you were successful with this? I have ordered some wooden looms, but I’m a pvc junkie and would love to give this a try.
this is super. Thank you very well.
I will make this as soon as i can.
great design. How long can you warp at one time (5-10ft)?
Well, it mostly worked for a bit, the problem ended up being that it was too easy to overtension, and doing that once popped the washers off the PVC, meaning the front arm wouldn’t stay in place. So I think if I fix it, I’ll either plug the PVC where the threaded rod goes with wood and drill a hole out or figure out some other tensioner method.
As for length, not a whole lot, between 4 and 5 feet, decent for small things but no belts or anything 🙂
How long are the heddle strings?
Sadly, I’m not sure how long the heddle strings were, I converted this over to tablet at some point to give it a try, and can’t find the heddles now. I can saw it was a fine shed for inkle, but really not all that good for tablet/card.